Фонд Zurb 3 формы
формы
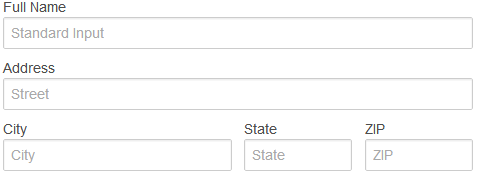
В этом руководстве вы узнаете, как создавать формы с помощью Zurb Foundation 3. Универсальные способы создания форм с помощью Foundation 3. Давайте начнем с простого примера.
Форма (расположение строк)

Код:
<!DOCTYPE html>
<html>
<head>
  <title>Form (row layout) with Foundation 3</title>
  <link rel="stylesheet" href="/zurb-foundation3/foundation3/stylesheets/foundation.css">
</head>
<body>
<div class="row">
<div class="six columns">
<form>
  <label>Full Name</label>
  <input type="text" placeholder="Standard Input" />

  <label>Address</label>
  <input type="text" class="twelve" placeholder="Street" />
  <div class="row">
    <div class="six columns">
	  <label>City</label>
      <input type="text" placeholder="City" />
    </div>
    <div class="three columns">
	  <label>State</label>
      <input type="text" placeholder="State" />
    </div>
    <div class="three columns">
	  <label>ZIP</label>
      <input type="text" placeholder="ZIP" />
    </div>
  </div>
</form>
</div>
</div>
</body>
</html>
Теперь мы можем сделать следующие выводы из приведенного выше примера:
- размер входных данных может быть определен с использованием размера столбца.
- строки могут быть созданы внутри элемента формы. Вы также можете определить столбцы в этом. Если строки создаются внутри объекта from, они по умолчанию получают специальные отступы для пробелов.
Ярлыки рядом с вводом
Иногда вам может понадобиться оставить ярлыки слева от ввода формы . Вот пример:

Код:
<!DOCTYPE html>
<html>
<head>
  <title>Form label left with Foundation 3</title>
  <link rel="stylesheet" href="/zurb-foundation3/foundation3/stylesheets/foundation.css">
</head>
<body>
<form>
<div class="row">
<div class="two mobile-one columns">
 <label class="right inline">Address:</label>
 </div>
 <div class="ten mobile-three columns">
 <input type="text" placeholder="e.g. Street" class="eight">
 </div>
 </div>
 <div class="row">
 <div class="two mobile-one columns">
 <label class="right inline">City:</label>
 </div>
 <div class="ten mobile-three columns">
 <input type="text" class="eight">
 </div>
 </div>
 <div class="row">
  <div class="two mobile-one columns">
  <label class="right inline">ZIP:</label>
  </div>
  <div class="ten mobile-three columns">
   <input type="text" class="three">
   </div>
  </div>
</form>
</body>
</html>
Итак, два класса, чтобы запомнить из последнего примера. Одним из них является «.right» и «.inline».
Fieldset
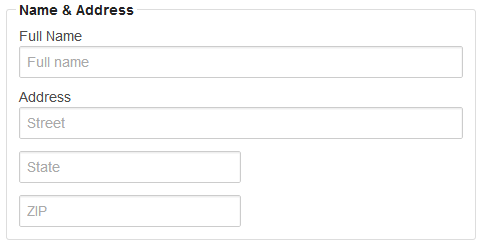
Наборы полей обертывают несколько связанных входов. Этот пример показывает, как использовать наборы полей:

Код:
<!DOCTYPE html>
<html>
<head>
  <title>Form fieldssets with Foundation 3</title>
  <link rel="stylesheet" href="/zurb-foundation3/foundation3/stylesheets/foundation.css">
</head>
<body>
<div class="row">
<div class="six columns">
<form class="custom">
 <fieldset>
  <legend>Name & Address</legend>

<label>Full Name</label>
<input type="text" placeholder="Full name">
<label>Address</label>
<input type="text" placeholder="Street">
<input type="text" class="six" placeholder="State">
<input type="text" class="six" placeholder="ZIP">

</fieldset>
</form>
</div>
</div>
</body>
</html>
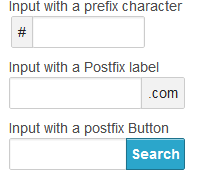
Ввод с префиксом, постфиксом и действующими символами

Код:
<!DOCTYPE html>
<html>
<head>
  <title>Form prefix, postfix and action with Foundation 3</title>
  <link rel="stylesheet" href="/zurb-foundation3/foundation3/stylesheets/foundation.css">
</head>
<body>
<div class="row">
<div class="six columns">
<label>Input with a prefix character</label>
<div class="row">
  <div class="four columns">
    <div class="row collapse">
      <div class="two mobile-one columns">
        <span class="prefix">#</span>
      </div>
      <div class="ten mobile-three columns">
        <input type="text" />
      </div>
    </div>
  </div>
</div>
<label>Input with a Postfix label</label>
<div class="row">
            <div class="five columns">
              <div class="row collapse">
                <div class="nine mobile-three columns">
                  <input type="text">
                </div>
                <div class="three mobile-one columns">
                  <span class="postfix">.com</span>
                </div>
              </div>
            </div>
          </div>
<label>Input with a postfix Button</label>
<div class="row">
  <div class="five columns">
    <div class="row collapse">
      <div class="eight mobile-three columns">
        <input type="text" />
      </div>
      <div class="four mobile-one columns">
        <a href="#" class="postfix button">Search</a>
      </div>
    </div>
  </div>
</div>
</div>
</div>
</body>
</html>
Состояния ошибок
Добавляя CSS-класс «.error» к таким элементам, как label, input и small или к столбцу контейнера или div, вы можете включать состояния ошибок с помощью Foundation 3. Вот фрагмент кода:
<div class="row">
  <div class="five columns">
    <label class="error">Field with Error</label>
    <input type="text" class="error" />
    <small class="error">Invalid entry</small>
  </div>
</div>
Радиокнопка и флажки
Вы можете создавать умные кнопки Radio и флажки с помощью Foundation 3. Для этого вам нужно добавить в форму класс «.custom» и добавить на веб-страницу jquery.min.js и jquery.customforms.js. Вот пример.

Код:
<!DOCTYPE html>
<html>
<head>
  <title>Form Radio buttons and check boxes with Foundation 3</title>
  <link rel="stylesheet" href="/zurb-foundation3/foundation3/stylesheets/foundation.css">
</head>
<body>
<form class="custom">
  <label for="radio1">
    <input name="radio1" type="radio" id="radio1"> Radio Button 1
  </label>

  <label for="radio2">
    <input name="radio1" type="radio" id="radio2" disabled> Radio Button 3
  </label>
  <label for="checkbox1">
  <input type="checkbox" id="checkbox1" style="display: none;">
  <span class="custom checkbox"></span> Label for Checkbox
</label>
<label for="checkbox2">
  <input type="checkbox" id="checkbox2" style="display: none;">
  <span class="custom checkbox"></span> Label for Checkbox
</label>
</form>
<script src="/zurb-foundation3/foundation3/javascripts/jquery.min.js"></script>
<script src="/zurb-foundation3/foundation3/javascripts/jquery.customforms.js"></script>
</body>
</html>
Выпадающий / Выбрать элементы
Вот пример того, как создавать элементы Dropdown и Select с помощью Foundation 3.

Код:
<!DOCTYPE html>
<html>
<head>
  <title>Form dropdown / select elements with Foundation 3</title>
  <link rel="stylesheet" href="/zurb-foundation3/foundation3/stylesheets/foundation.css">
</head>
<body>
<div class="row">
<h2>Form dropdown / select elemenets with Foundation 3</h2>
<form class="custom">
  <label for="customDropdown">Select your favourite language</label>
<select style="display:none;" id="customDropdown">
  <option SELECTED>PHP</option>
  <option>Ruby</option>
  <option>ASP.NET</option>
</select>
</div>
</form>
<script src="/zurb-foundation3/foundation3/javascripts/jquery.min.js"></script>
<script src="/zurb-foundation3/foundation3/javascripts/jquery.customforms.js"></script>
</body>
</html>
Предыдущий: Zurb Foundation 3 кнопки
Следующая: Zurb Foundation 3 Navigation
Новый контент: Composer: менеджер зависимостей для PHP , R программирования